From the workshop
One scene, many maps: layered map surfaces in the VTT
Put several maps in one VTT scene, stack matching floors into a building, and let transparent roofs reveal the rooms beneath them.
A VTT scene can hold more than one map. I use it all the time: a house and its cellar, the farm down the lane, or the three small encounter maps I'll probably need tonight, all sat on one board. I don't have to flatten them into one giant image or keep swapping scenes.
Every map in a scene is a proper map. It has its own grid, walls, lights, fog and tokens, and players only see the maps you let them see.
You set all this up on the board itself. There used to be a Layers panel in the dock for it, but that's gone now.
Arrange maps mode
Arrange mode is where you lay a scene out. There are three ways in:
Click the map pill in the bottom-left corner and choose Arrange maps. The pill shows the name of the map you're working on.
Press Shift+M.
With a Map layer active, choose Arrange maps on the Select tool's bar.
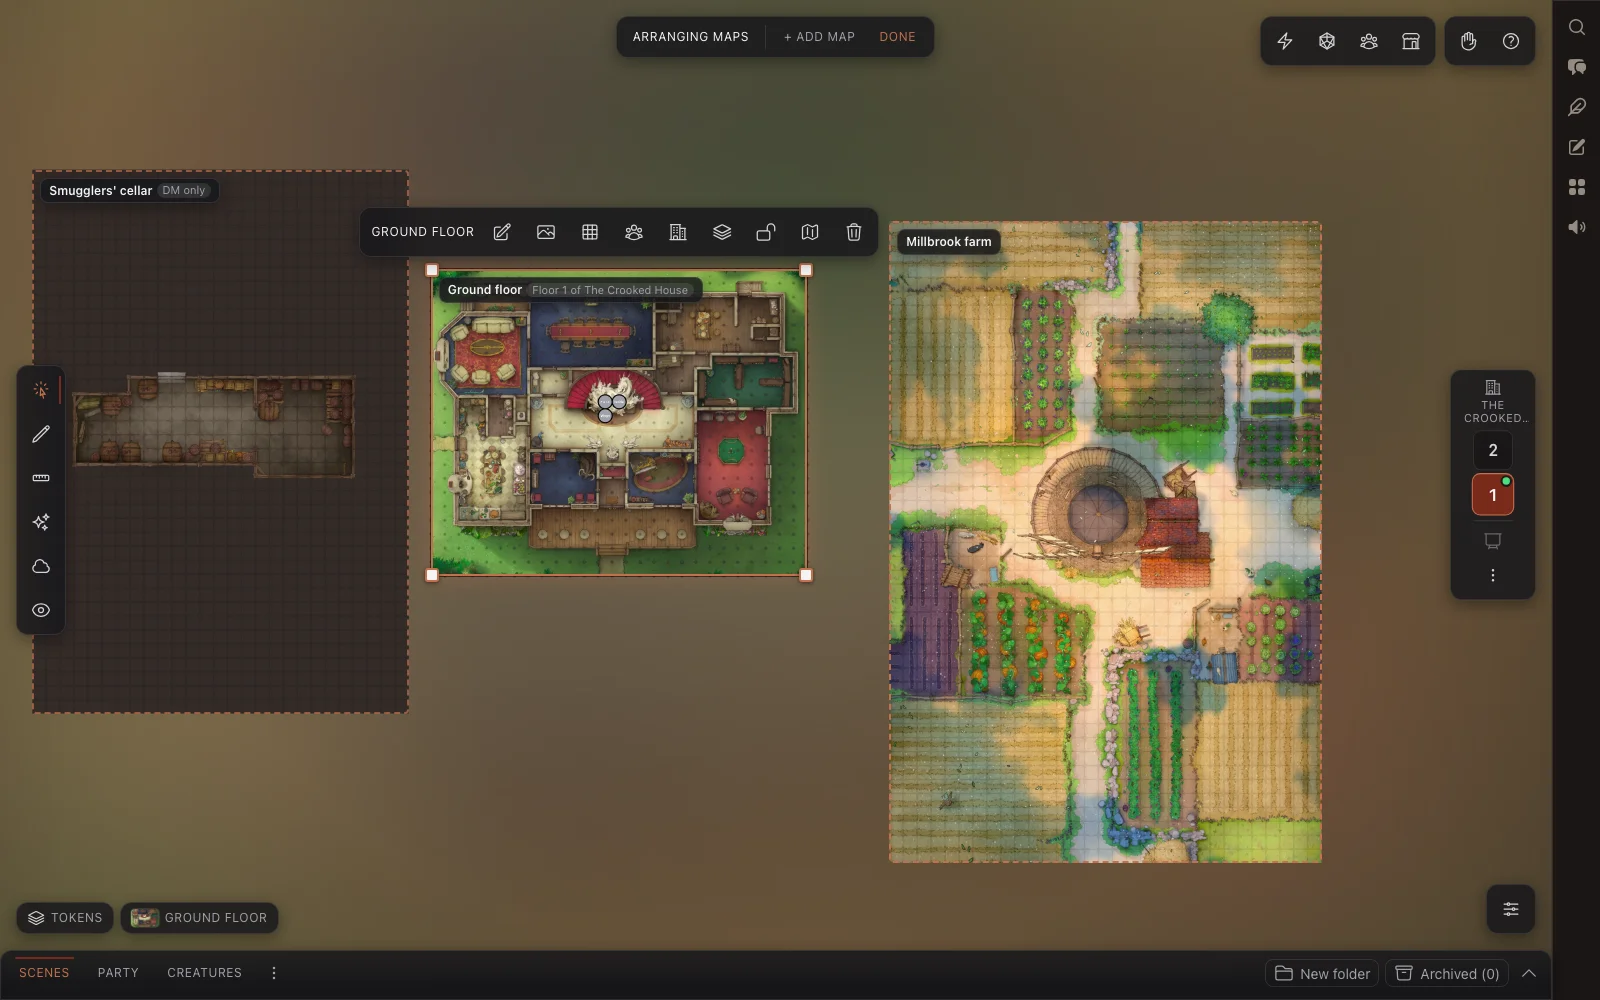
In arrange mode, every map gets a frame with its name on it. Drag a map to move it, and drag a corner to resize it without squashing it. Maps snap to each other's edges and to the grid; hold Alt if you don't want that. The arrow keys nudge the selected map one square at a time, or five with Shift. You can still pan with a right-drag and zoom with the wheel.
Click a map to select it and a toolbar appears above it:
Rename
Set art, to upload an image or use a map from your compendiums
Grid, for this map's own grid
Who can see
Floors, to make a building out of this map or add it to one
Order, to Bring forward or Send backward where maps overlap
Lock in place. A locked map loses its handles, so you can't knock it out of place while prepping.
Pieces on this map…, a list of everything that sits on it
Remove map. The pieces on it stay on the table.
Press Done at the top, or Esc, when you've finished.
Adding a map
In arrange mode, click any empty bit of the board and choose what goes there:
Upload an image…
Choose a compendium map…
Import a UVTT file…, which brings its grid, walls, doors and lights with it
Blank map
+ Add map at the top does the same thing, but drops the map in the middle of your view.
You can also bring in a UVTT or DD2VTT export from the New scene dialog. Choose From file and tick Add it to the current scene as another map instead.
A blank map or an uploaded image takes the grid from the scene's first map. A compendium map brings its own grid, already calibrated. The maps in a scene don't have to match. A 70px dungeon can sit right next to a 140px village.
The working map
Only one map is the working map at a time. The grid, fog, lighting and wall tools all act on it, so drawing walls on the cellar won't mess with the ground floor. Its name is on the pill in the bottom-left corner. Open the pill to pick another map, and the camera glides over to it.
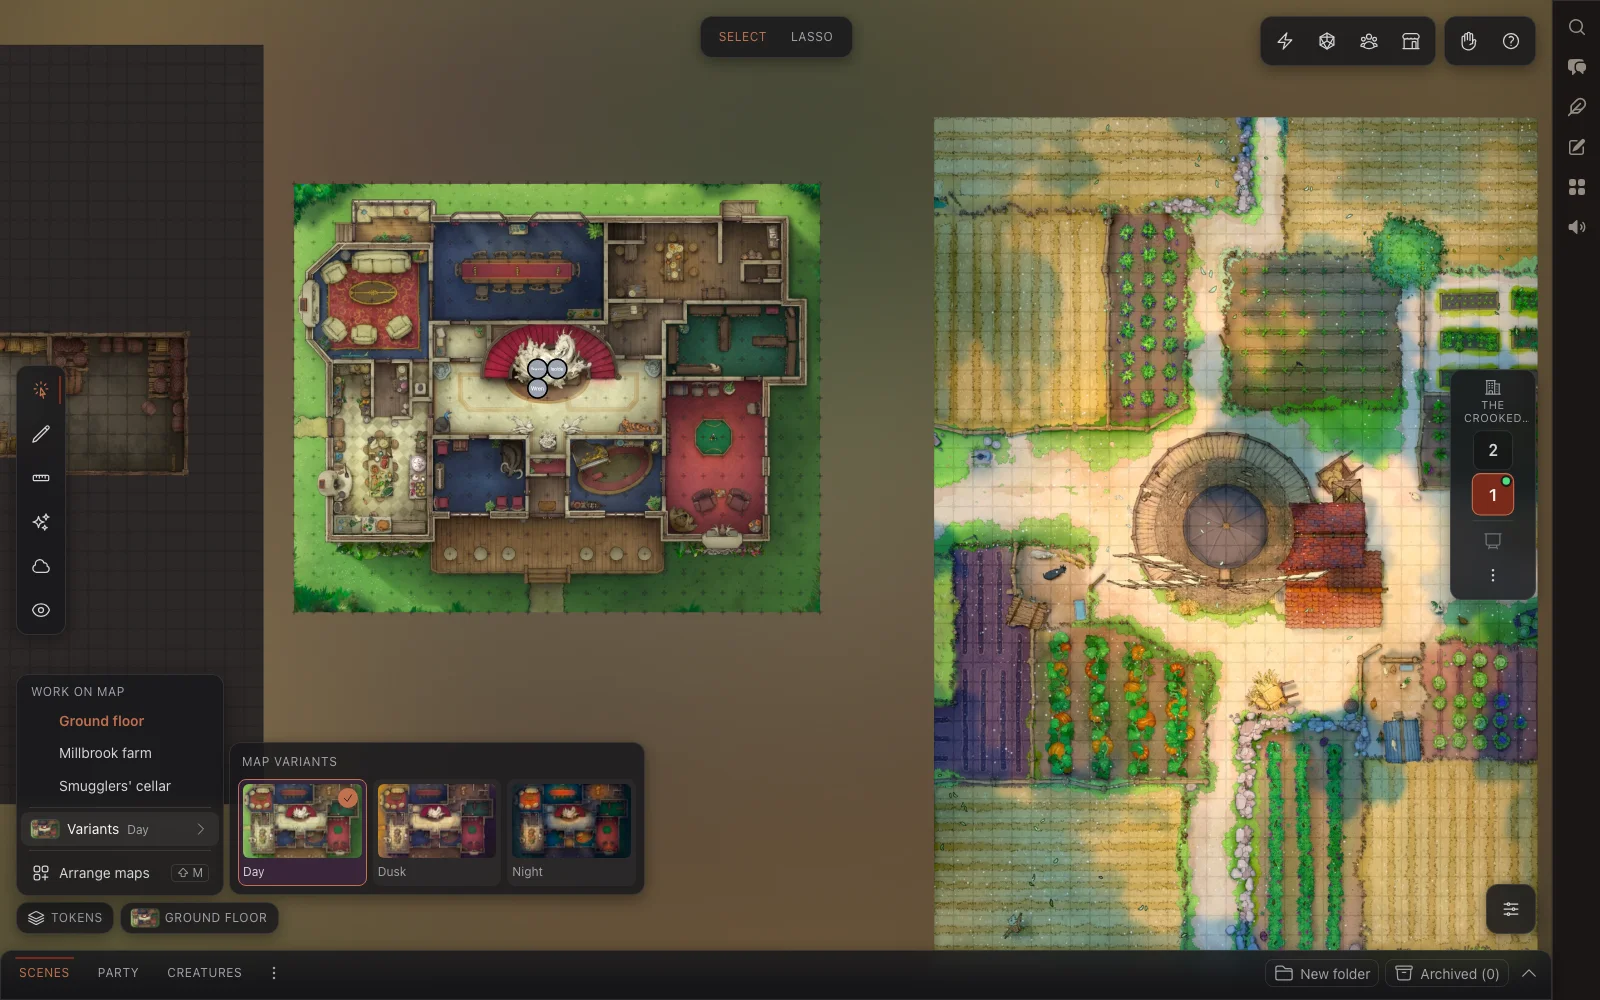
If the working map comes from a compendium map with variants, the same menu has a Variants drop-out. Pick Night and that map switches to its night art. Nothing else in the scene changes. If a compendium has scenes made for the map, you'll see a Linked scenes drop-out too. It holds full-screen art you can put up for the whole table.
When a scene has more than one map, the scene settings panel names the map it's changing, like "Map: Ground floor".
Each map has its own grid
The Grid tool on a map's toolbar opens that map's grid settings. Give the square size in pixels, or tell it how many squares the art is across or down and it'll work out the rest. You can also set the offset, the distance per square, and turn the grid off completely for that map. If you need to line it up by eye, Align visually… opens the full map editor for just that map.
Tokens are sized by the grid of the map they're standing on, and measuring uses that map's squares.
Floors and buildings
When maps are levels of the same place, turn them into a building. Select the ground floor in arrange mode, open Floors and choose one of these:
Make floors: add a blank floor above
Make floors with Upper floor above, if the next level is already a map in the scene
After that, use Add a floor above to keep building upwards, or add a loose map to an existing building as its top floor. The building starts out with the ground floor's name, so rename it to something more useful, like "The Crooked House".
A building moves as one piece. Drag any floor and every floor goes with it. Each floor keeps its own size, so you can still line up art that was drawn at slightly different scales.
The floor rail
When the working map is part of a building, a floor rail shows up on the right-hand edge of the board. Floors are numbered from the ground up, with the top floor at the top. Click a number to look at that floor.
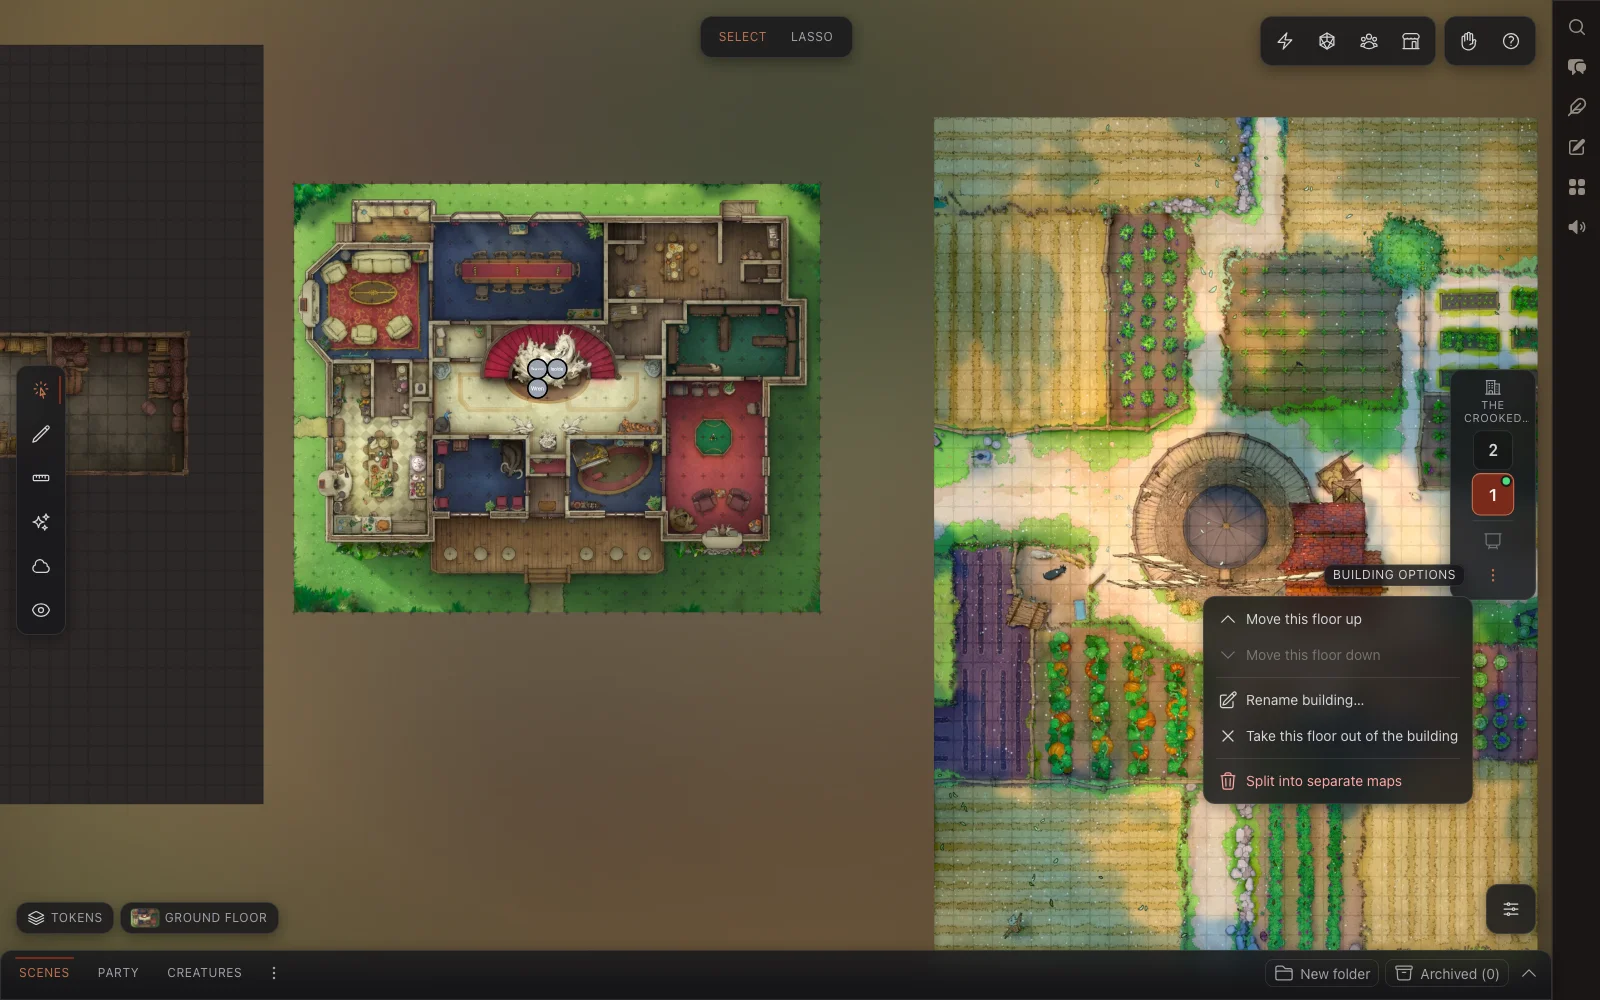
Switching floors on the rail only changes your own view, so you can check the attic while the party is still downstairs. When they head up, press the Show to players button under the numbers. Every player moves to that floor, even someone whose token is on another floor. A green dot marks the floor the players were last shown.
The ⋮ menu under the rail lets you move a floor up or down, rename the building, take a floor out, or Split into separate maps.
Players get the rail too, but it only lists the floors they know about. That means floors they've been shown, or floors one of their tokens has been on. They can hop between those on their own, and that sticks until you show them a floor again. If there's only one floor to choose from, there's no rail. Every map has its own fog, so going back downstairs shows exactly what they'd already explored down there.
Who can see a map
Who can see on a map's toolbar has three options:
Everyone
Players with a token here, so a player only sees the map while a token they control is standing on it
DM only
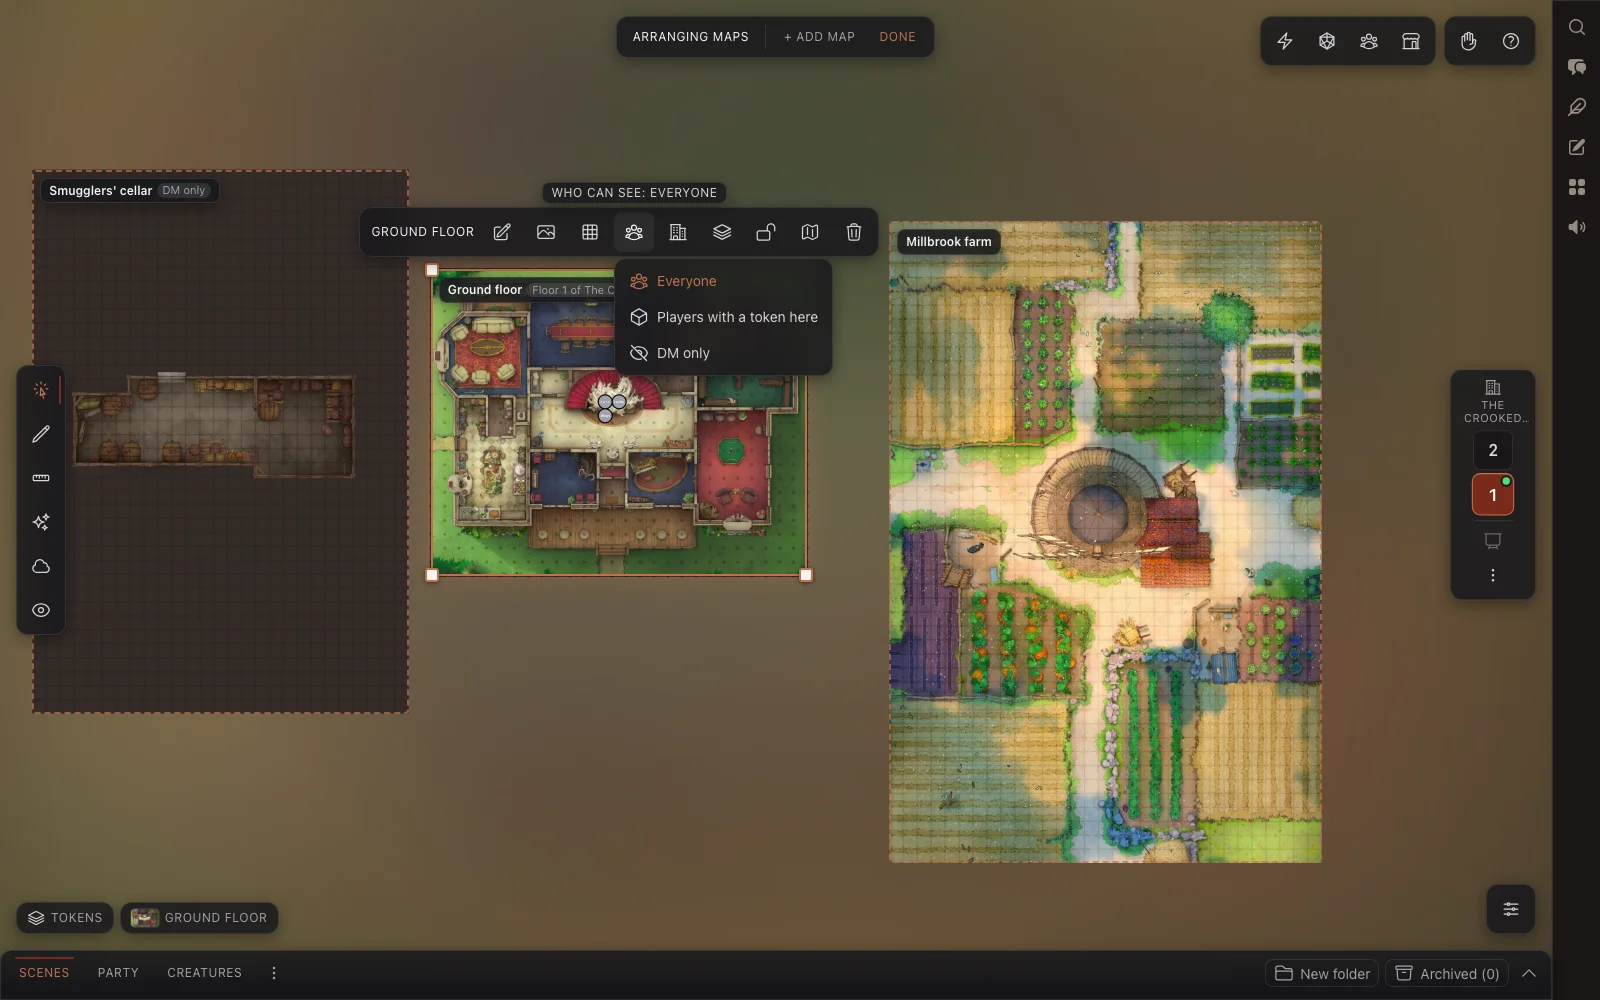
Players with a token here is good for the scout who slips off ahead. She sees the smugglers' cellar once she's down there, and the rest of the party doesn't. It updates as tokens move, including when one goes through a portal.
DM only maps have a dashed outline and a badge in arrange mode, and players never receive them at all. You can't show a DM-only floor to the table, and a token-holders floor can't be shown to everyone either, since some players wouldn't be able to see it. The rail explains why the button is greyed out.
Keeping pieces on the right map
A token, drawing, pin or card pile belongs to whichever map you drop it on. When you move that map, the piece goes with it. Dragging a token onto another map moves it over. You can't drag pieces from two different maps as one selection, and the board tells you so if you try.
Pieces on this map… opens a searchable list of everything in the scene, grouped as Underfoot, Tokens, Overhead and Annotations. From that list you can:
Change what a piece is attached to. Pick another map, or choose Canvas to leave it loose on the board. I leave staging tokens loose until I know where they're going.
Hide it in your own workspace. The eye icon gets a roof or a token out of your way while you work underneath. Nobody else's view changes.
Change its real audience. Switch Everyone to DM only for secrets. Players never receive DM-only pieces, which is safer than hoping they don't look.
Portals between maps
Portals connect stairs, ladders, trapdoors and lifts to the right spot on another map.
Open Pieces on this map… and choose Portal next to the map where the stairs are.
Close the list and press Done to leave arrange mode.
Click where the portal starts.
Give it a name, like "Up to the loft", then pick the destination map and choose Choose arrival point.
Click where tokens should arrive on that map.
The dialog has three options, and all of them start switched on: Two-way portal, Teleport when a token enters, and Players can see and use it. Untick Teleport when a token enters and walking onto the stairs does nothing by itself. The token's menu offers the trip instead, which gives you time for a locked door, or for deciding the stairs are full of something unpleasant.
You can also point a portal at a map in a different scene. It'll arrive in the middle of that map.
Roofs that fade under tokens
Lots of map makers include a transparent PNG of roofs or tree canopies alongside the base map. Don't make that a floor. Put it on the Map foreground layer of the same map so it stays lined up over the interior. Then right-click it and turn on Fade under token.
Bookwyrm reads the image's transparency and splits it into separate roofs. When a player's token is mostly under one of them, only that roof fades to a faint ghost. The rest stay put. The fade is per player too: someone who walks into the tavern sees inside, and the friend waiting outside still sees the roof.
If the automatic split gets it wrong, find the image under Overhead in Pieces on this map…. Merge roofs joins roofs that should fade together, Split roofs separates them, and Regenerate throws away your edits and reads the image again.
How I put a location together
Open arrange mode and drop in each map image I've got.
Make floors from any levels of the same building, and give the building a proper name.
Put roof and canopy PNGs on the Map foreground of the map underneath, with Fade under token on.
Set Who can see on each map: the secret cellar as DM only, the scout's route as Players with a token here.
Add portals once both ends of the stairs exist.
Fix any grid that's off with the Grid tool.
At the table, all I really use is the floor rail and Show to players.